
In this article, I’m going to demonstrate the use of GitHub Actions to publish open-source Android Library to Bintray when it is released.
You might have developed a cool open-source android library 🛠️. You have published it to Bintray/JCenter. Right? But you’re publishing it manually using Gradle CLI ./gradlew bintrayUpload command. After you made changes in your library, you always run Gradle command manually. Want to see how you can automate publishing it using GitHub Actions CI? Then you are at the right place.
We will see how to publish your open-source cool android library to Bintray automatically when we create a new release in GitHub repository. So, let’s start 😃.
Before starting, you’ll need to do some tasks with Bintray profile. If you’ve already done, you can skip this part and directly go to the next part ⚡.
💻 Setup Bintray 🛠️
- Visit Bintray and set up your account there.
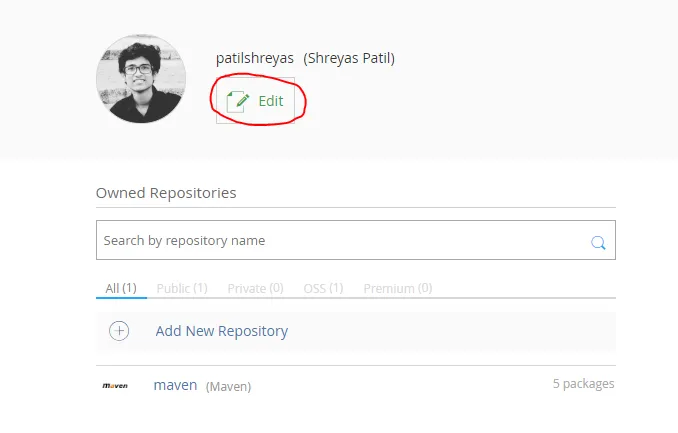
- Go to Home → Repository and create a maven repository and keep its name of your choice. I’ve named it ‘maven’. (Remember, it’ll be useful in upcoming steps.)
- After this, it’ll look like below. Click Edit.
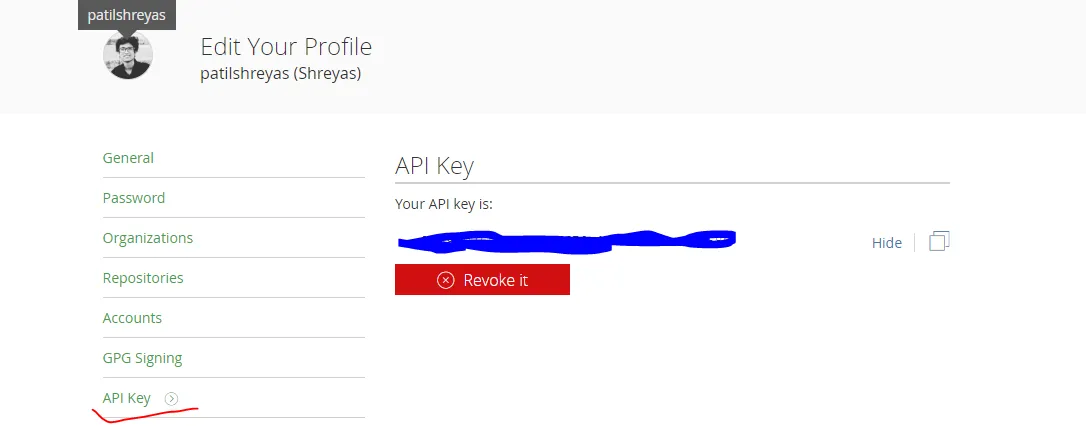
- Select API Key from the left menu and Copy or Keep this API Key for future reference.
Thus, you’re done with Bintray set up. Now let’s see the Android part.
💻 Android Library Set up
In build.gradle of your project module, ensure that you’ve below plugins added:
dependencies {
        classpath 'com.android.tools.build:gradle:3.6.2'
        classpath "org.jetbrains.kotlin:kotlin-gradle-plugin:$kotlin_version"

        // Required plugins added to classpath to facilitate pushing to Jcenter/Bintray
        classpath 'com.jfrog.bintray.gradle:gradle-bintray-plugin:1.8.4'
        classpath 'com.github.dcendents:android-maven-gradle-plugin:2.1'
    }
Add these plugins in the build.gradle file of the library module:
apply plugin: 'com.android.library'
apply plugin: 'kotlin-android'
apply plugin: 'com.github.dcendents.android-maven'
apply plugin: 'com.jfrog.bintray'
Now, we’ve to set up library configuration 🛠 for the Bintray in this file. Just append build.gradle file of library module with the code as below:
ext {
    // This should be same as you've created in bintray
    bintrayRepo = 'maven'

    // Name which will be visible on bintray
    bintrayName = 'CoolLibrary'

    // Library Details
    publishedGroupId = 'dev.shreyaspatil'
    libraryName = 'CoolLibrary'
    artifact = 'CoolLibrary'
    libraryDescription = 'Cool Library'
    libraryVersion = version

    // Repository Link (For e.g. GitHub repo)
    siteUrl = 'https://github.com/patilshreyas/AndroidLibDemo'
    gitUrl = 'https://github.com/patilshreyas/AndroidLibDemo.git'
    githubRepository= 'patilshreyas/AndroidLibDemo'

    // Developer Details
    developerId = 'patilshreyas'
    developerName = 'Shreyas Patil'
    developerEmail = 'shreyaspatilg@gmail.com'

    // License Details
    licenseName = 'The Apache Software License, Version 2.0'
    licenseUrl = 'http://www.apache.org/licenses/LICENSE-2.0.txt'
    allLicenses = ["Apache-2.0"]
}

// This is mandatory
group = publishedGroupId

install {
    repositories.mavenInstaller {
        // This generates POM.xml with proper parameters
        pom {
            project {
                packaging 'aar'

                groupId publishedGroupId
                artifactId = artifact
                name libraryName
                description = libraryDescription
                url siteUrl

                licenses {
                    license {
                        name licenseName
                        url licenseUrl
                    }
                }
                developers {
                    developer {
                        id developerId
                        name developerName
                        email developerEmail
                    }
                }
                scm {
                    connection gitUrl
                    developerConnection gitUrl
                    url siteUrl
                }
            }
        }
    }
}

// Avoid Kotlin docs error
tasks.withType(Javadoc) {
    enabled = false
}

// Remove javadoc related tasks
task javadoc(type: Javadoc) {
    source = android.sourceSets.main.java.srcDirs
    classpath += project.files(android.getBootClasspath().join(File.pathSeparator))
}

task sourcesJar(type: Jar) {
    from android.sourceSets.main.java.srcDirs
    classifier = 'sources'
}

task javadocJar(type: Jar, dependsOn: javadoc) {
    classifier = 'javadoc'
    from javadoc.destinationDir
}
artifacts {
    archives javadocJar
    archives sourcesJar
}

// https://github.com/bintray/gradle-bintray-plugin
bintray {
    user = System.getenv("bintrayUser")
    key = System.getenv("bintrayApiKey")

    configurations = ['archives']
    pkg {
        repo = bintrayRepo
        name = bintrayName
        websiteUrl = siteUrl
        vcsUrl = gitUrl
        licenses = allLicenses
        publish = true
    }
}
About these variables:
bintrayRepo— Name of the repository you’ve created in previous steps.bintrayName— Name which will be visible on Bintray.- Change the values of other fields of your choice.
Note: Notice that we’re reading Bintray User and Bintray API Key from the system environment variable using
System.getenv()method. This will be significant in the GitHub Actions Workflow setup.
Now, you’ve done this part and now push your code to the GitHub repo for next step.
💻 Setting up on GitHub
Go to Settings → Click Add new Secret. You’ve to add two secret values for this repo: BINTRAY_USER and BINTRAY_API_KEY.
BINTRAY_USER— Your Bintray UsernameBINTRAY_API_KEY— Your Bintray API Key (Which you’ve copied in the previous step).
After adding these secrets, it should look as below 👇:

💻 Setting up GitHub Actions Workflow
Now just create a workflow file named publish.yml which will be responsible to publish your library automatically on every release.
Just create a .github directory at the root of GitHub repository. Under it, create workflows directory and put the below file in this. So the path would be .github/workflows/publish.yml. Or simply, you can directly create the workflow by clicking the Actions tab and then create Workflow from available templates.
name: Publish Bintray
on:
  release:
    types: [published]

jobs:
  publish:
    runs-on: ubuntu-latest

    steps:
      - uses: actions/checkout@v1
      - name: Set up JDK 1.8
        uses: actions/setup-java@v1
        with:
          java-version: 1.8
      - name: Grant Permission to Execute
        run: chmod +x gradlew
      - name: Publish Library
        env:
          bintrayUser: ${{ secrets.BINTRAY_USER }}
          bintrayApiKey: ${{ secrets.BINTRAY_API_KEY }}
        run: ./gradlew bintrayUpload
Note: Notice that we’ve exposed system environment variable
bintrayUserandbintrayApiKeywhich values we’re getting from GitHub secrets. Remember that we’re reading these values inbuild.gradleusingSystem.getenv()method.
Finally, it’s running a command ./gradlew bintrayUpload which will publish your library to the Bintray!
Test it! 😃
Now let’s test if it is working or not.
Go to Releases of your repository and click Create new Release and create release as below and click Publish Release 👇:
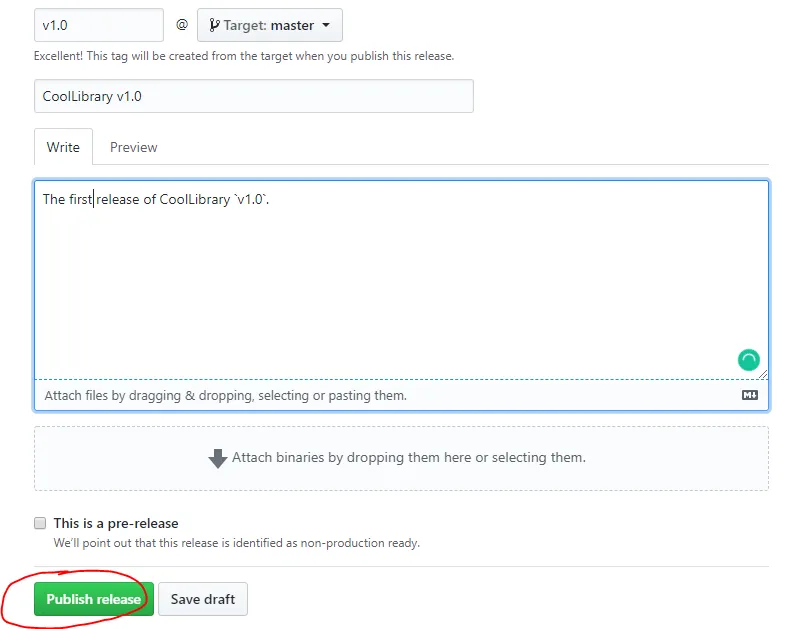
After you click Publish release, that workflow we created earlier will be triggered and it will start its execution.
Now just navigate to Actions tab of your GitHub repo and notice that your Action is running. Finally, after execution is done, you’ll see the result as below! 👇:
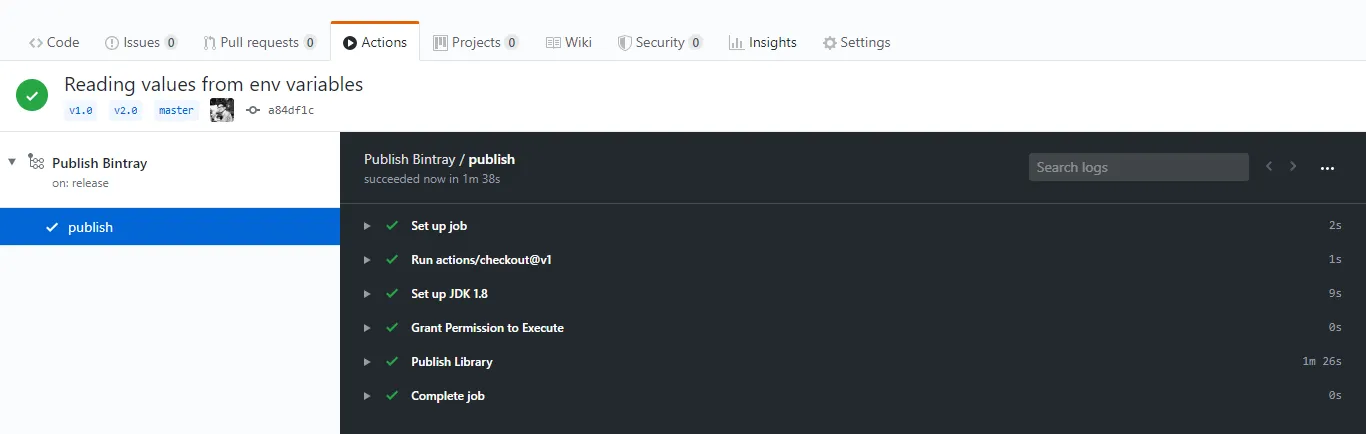
Yeah 😍!!! Your cool open-source Android library is just successfully published in Bintray JFrog repository. Let’s verify it. 😃
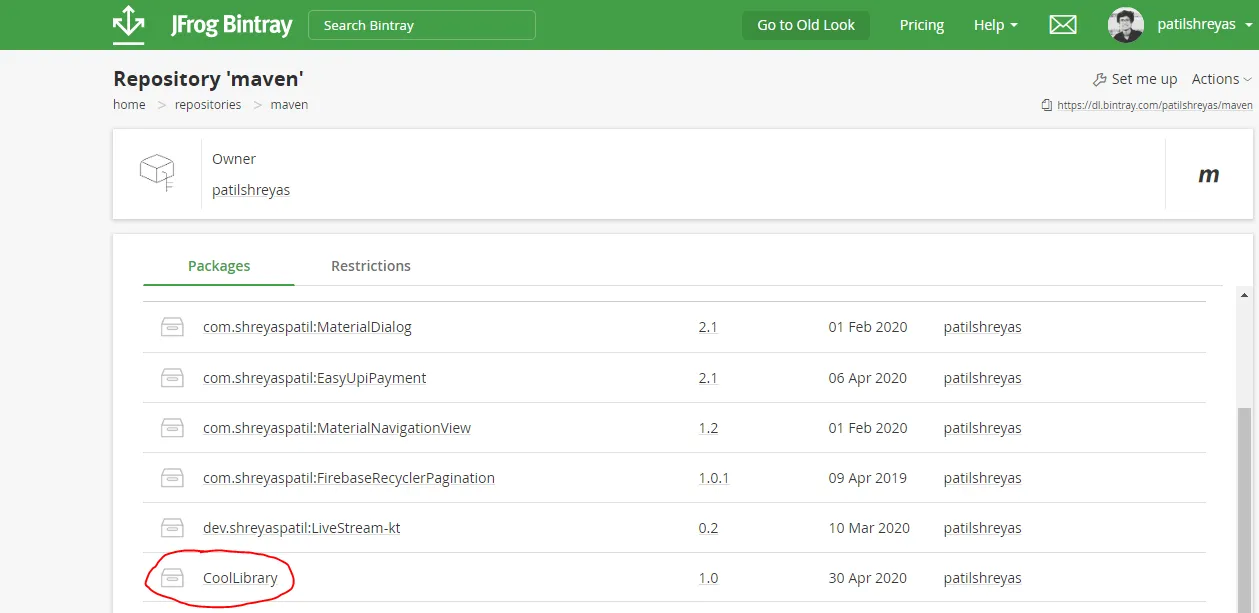
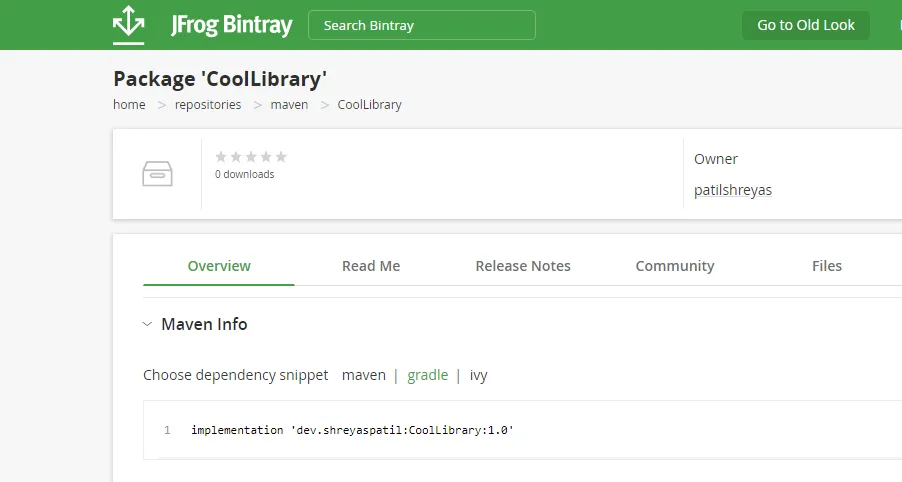
Go to your Bintray account and open Maven repository you created earlier and see your library is listed there. Now, officially your library is published and it can be imported in Android projects. 👇:
This is how we automated publishing your cool open-source android library to Bintray using GitHub Actions.
In the future, you will not need to manage it manually 😎. You just make changes in the library and create Release on GitHub and a new version of the library will be automatically published to the Bintray and it’ll be live in a few seconds 🚀.
Yeah 😍! Hope you liked that. If you find it helpful please share this article. Maybe it’ll help someone needy!
Thank you 😄!
Sharing is Caring!
📚 Resources
Here is a repository that contains the code used in this article:
PatilShreyas/AndroidLibDemo - GitHub
If you want to contact me, feel free to reach me…